We all know that China Unicom is one of the three major communications industries. Now, China Unicom has network set-top boxes. Want to know how Unicom network set-top boxes are installed? Want to know how Unicom network set-top box password is set? Then go with Xiao Bian to see it.

Unicom network set-top box installation steps:
1. Link the HDTV power cable.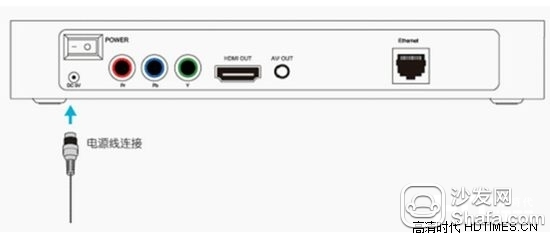
2. Use the supplied AV cable or HDMI high-definition multimedia cable to connect the HDTV to the TV.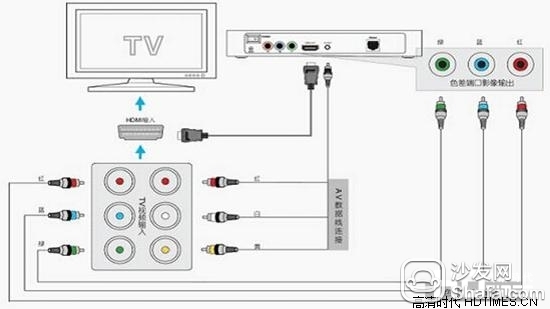
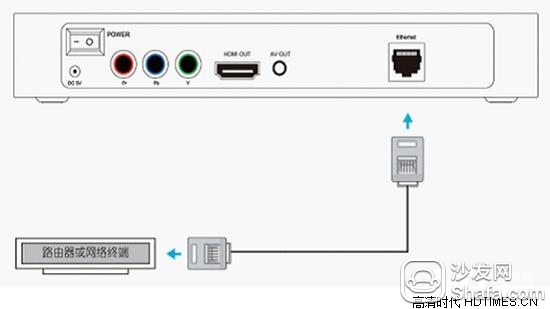
3. Insert the home broadband cable into the cable jack of the HDTV, or connect the HDTV to the home router.
4. After confirming that the power supply, AV or HDMI cable is connected correctly and the home network is in the normal access state, turn on the HDTV and TV power respectively.
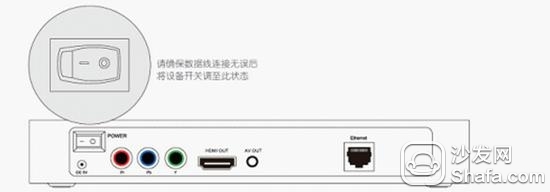
5, after booting, please select different TV output signal source according to the connecting cable used: AV cable connection is to choose AV port integrated output, HDMI cable connection is to select HDMI port video output. After selecting the source, the TV will display the login or main menu interface. At this time, it indicates that it has started normally.
Unicom network set-top box password settings:
1, AP settings:
1) Plug the network cable into the AP's LAN port. The local network card's IP address is set to 192.168.18.3 with a mask of 255.255.255.0.
2) After determining that the local IP address is set correctly, open IE and enter http://192.168.18.1.
3) Enter username and password: both are admin.
4) Go to the initial page and click on "Advanced Settings".
5) Click on "WAN Settings" to modify the relevant options, click on the "Submit" button on the right side of the page, the page will prompt "set up successfully."
6) If the settings are correct, you can see in the "status record" that the router WAN port has obtained the public network IP address.
7) Click "Wireless Settings" to modify the relevant options, including SSID (8 digits for unified broadband account), use type of AP, use frequency band (select one of 1, 6, and 11), and click "Submit" button on the right side of the page. The page will prompt "Setup is successful". The network name (SSID) must be modified. Do not use the default. Otherwise, if there are other APs that use the default network name nearby, the wireless bridge will fail to identify. To maintain uniqueness, it is recommended to set the network name. Set as the user's broadband account.
8) Click on "System Settings" and select "Gate Mode". Click on the "Submit" button on the right side of the page. The page will say "Setting up successfully". For security, please change the router's access password. Click "Change Password" in the upper right corner of the page. The password is changed to 8 digits for the broadband account. Finally, click "Reboot Router" at the top right of the page.
9) Finally, click on "LAN Settings" and change the address from 192.168.18.1 to 192.168.18.2. After the setting takes effect, you need to configure the AP. You must enter 192.168.1.2 in the IE address bar.
2, wireless bridge:
In this scenario, the bridge and the AP use the same wireless router, so the access method is the same as the AP. Only explain the settings after entering
1) Click “Wireless Settings†Select “Client†for the type of use. The ESSID is the same as the one on the AP (8 digits for the broadband account). Click on the "Submit" button on the right side of the page. The page will say "Setting successful".
2) Click on "System Settings" to select "Bridge Mode" and click on the "Submit" button on the right side of the page. The page will say "Set Up Successfully". For security, please change the access password of the router. You can click "Change Password" at the top right of the page, and then click "Reboot Router" at the top right of the page.
Unicom network set-top box installation steps:
1. Link the HDTV power cable.
2. Use the supplied AV cable or HDMI high-definition multimedia cable to connect the HDTV to the TV.
3. Insert the home broadband cable into the cable jack of the HDTV, or connect the HDTV to the home router.
4. After confirming that the power supply, AV or HDMI cable is connected correctly and the home network is in the normal access state, turn on the HDTV and TV power respectively.
5, after booting, please select different TV output signal source according to the connecting cable used: AV cable connection is to choose AV port integrated output, HDMI cable connection is to select HDMI port video output. After selecting the source, the TV will display the login or main menu interface. At this time, it indicates that it has started normally.
Unicom network set-top box password settings:
1, AP settings:
1) Plug the network cable into the AP's LAN port. The local network card's IP address is set to 192.168.18.3 with a mask of 255.255.255.0.
2) After determining that the local IP address is set correctly, open IE and enter http://192.168.18.1.
3) Enter username and password: both are admin.
4) Go to the initial page and click on "Advanced Settings".
5) Click on "WAN Settings" to modify the relevant options, click on the "Submit" button on the right side of the page, the page will prompt "set up successfully."
6) If the settings are correct, you can see in the "status record" that the router WAN port has obtained the public network IP address.
7) Click "Wireless Settings" to modify the relevant options, including SSID (8 digits for unified broadband account), use type of AP, use frequency band (select one of 1, 6, and 11), and click "Submit" button on the right side of the page. The page will prompt "Setup is successful". The network name (SSID) must be modified. Do not use the default. Otherwise, if there are other APs that use the default network name nearby, the wireless bridge will fail to identify. To maintain uniqueness, it is recommended to set the network name. Set as the user's broadband account.
8) Click on "System Settings" and select "Gate Mode". Click on the "Submit" button on the right side of the page. The page will say "Setting up successfully". For security, please change the router's access password. Click "Change Password" in the upper right corner of the page. The password is changed to 8 digits for the broadband account. Finally, click "Reboot Router" at the top right of the page.
9) Finally, click on "LAN Settings" and change the address from 192.168.18.1 to 192.168.18.2. After the setting takes effect, you need to configure the AP. You must enter 192.168.1.2 in the IE address bar.
2, wireless bridge:
In this scenario, the bridge and the AP use the same wireless router, so the access method is the same as the AP. Only explain the settings after entering
1) Click “Wireless Settings†Select “Client†for the type of use. The ESSID is the same as the one on the AP (8 digits for the broadband account). Click on the "Submit" button on the right side of the page. The page will say "Setting successful".
2) Click on "System Settings" to select "Bridge Mode" and click on the "Submit" button on the right side of the page. The page will say "Set Up Successfully". For security, please change the access password of the router. You can click "Change Password" at the top right of the page, and then click "Reboot Router" at the top right of the page.
External Ups Batteries,Ups Battery Cabinets,Universal Battery Cabinets,IDC Solutions
Shenzhen Unitronic Power System Co., Ltd , https://www.unitronicpower.com