The initial contact with the raspberry pie was in early April, but because the family was stolen, it created the idea of ​​installing a monitor:
As a result, she searched for a certain east, because the home was already renovated. If too much cabling is needed, it would destroy the overall situation. It would be very conspicuous, and it would also destroy the overall environment. People would have a very abrupt Feeling, the first thing that comes to my mind is naturally the wireless monitor goddess, looking for a long time from a certain east. From now on, the prices are fairly good, and some 300 can also buy some, but when I was looking for in April, One is less than 450, and a video recorder or an old computer is used as a host to store video data. This also requires a dedicated space to store the host or video recorder, and the cost of electricity is not small. Expenses (as opposed to the solution I chose), taking into account the continuity of the transmission of video files, the test of the wireless router is also an aspect, the use of wifi at home is still dependent on: smart TV, mobile phones, computers, also With IPTV, if you add video surveillance, you may also need to upgrade dual-band gigabit wireless routers, which is also an expense;
After consulting the students in the local computer city to do monitoring, the students told the wireless monitoring is not stable, the price is slightly higher, if I want the whole, it might as well use a simulation head, where he has a set of old video recorders and an analog head, did not stand Use, if you want to use, you can go and get it. But I went to the scene to see the effect of the simulation head. I really felt that even if I was in the living room, I couldn't see it from the door. I felt that the pixel was similar to the one used on the computer. It was not clear enough. It might be only around 50W. The pixel; é‚ to give up the analog head; if you use high-definition webcam (non-WIFI), because the original decoration, is to set the idea to use the wifi network, so the wiring did not take into account the monitoring, the reserved line is not enough, it needs Wiring, this plan has also been denied;
I think the current thief is concerned, if you install a video surveillance head that requires a video recorder, if the thief knows it, then it can damage the video recorder or hard disk, so that video surveillance is meaningless. Moreover, from the cost point of view, if you install an ordinary security monitoring system, a monitoring head is not worthwhile, the most common video recorder is four-way, from a cost-effective point of view, installed four head is the most cost-effective, this way, One-time investment costs will be higher, although nothing compared to the loss of stolen, but in the principle that money should be spent on the edge, and leaders have been deliberating on the decision to give up this program.
The use of hidden micro-camera program, according to students, this monitoring market is not allowed to openly sell, can only be a Taobao Tao, but some Amoy electronic products mixed, said the hype, the actual effect may not be used , And I wanted to achieve immediate results, so I thought I could have a system, it is best to use wifi network, stored locally, but if necessary, according to specific conditions, triggered after transmission to the network somewhere, Network disk, mailbox, etc.
When I was unable to do anything,
Just looking at the information about the raspberry pie in Aunt Zhang’s place, he thought of using the raspberry pie and the official raspberry pie to capture a relatively hidden surveillance and upload the pictures and videos to the Internet. Monitoring is destroyed and data cannot be taken away. There will be great help in solving the case, and the loss can be minimized. The most important thing is that this program just needs to find a placement place for the Raspberry Pi, a credit card-sized host, and give him a power supply. Others are using existing wifi and wired networks, plus their own network programming capabilities, the latter will be much better scalability, because just contact the Raspberry Pi, the performance of the special camera for the Raspberry Pi is not very understanding, Video recording capabilities are also in doubt, but he is very satisfied with his 500W pixel high quality photos, and then also found an online video surveillance alternative: yeelink's picture monitoring, a fixed time interval of a picture composed of a timeline From a certain extent, it is also worse than video surveillance.
In this way, the plan for using the Raspberry Pi to set up my monitoring system was basically determined: less money, less cabling, and a small change in the layout of the home. Although it was changed from video surveillance to picture monitoring, it can continue to improve in the later period. However, the problem also followed. The yeelink platform is a startup platform for start-up companies. The stability of the platform and whether it is free or later are unpredictable, but in the current situation, it should be no problem to use one year. Using this time, you can fully use the web program to save the pictures saved on the camera to your own payment space, or save it directly on the external hard disk of the Raspberry Pi. You can even use the infrared detection module to trigger the video recording function. In this way, the combination of video and picture monitoring can save storage space and network bandwidth, and it can also play a good role in theft prevention.
Raspberry pi B+
Raspberry pie HDMI HD cable
EP-N8508GS Raspberry Pi Free Driver Wireless LAN Card
Raspberry Pi Night Vision Infrared Camera
Do not understand from the beginning, Baidu and google everywhere, online to find the information is not very satisfactory, and even yeelink official tutorial can not be used, can not upload the file correctly. Through multiple comparisons of online materials. Finally the whole success.
All right. Not much to say, the installation of the system, a lot of online tutorials, Zhang Aunt here is also an article, I will not posted.
This article focuses on picture monitoring and nas download section.
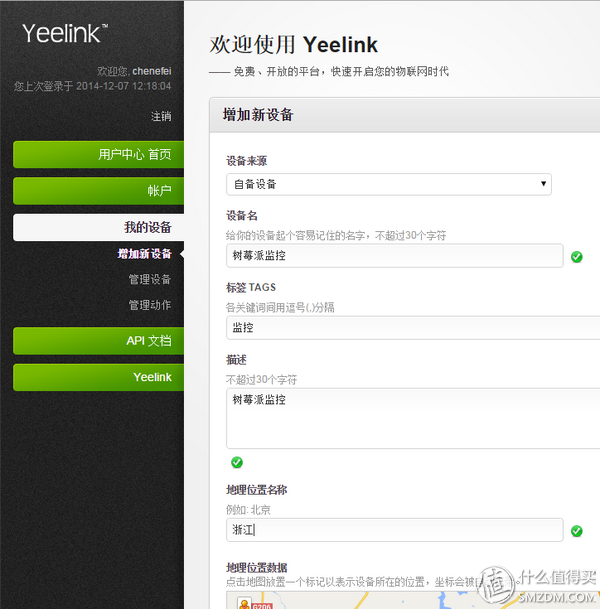
First register your Yeelink account, then add a new device:
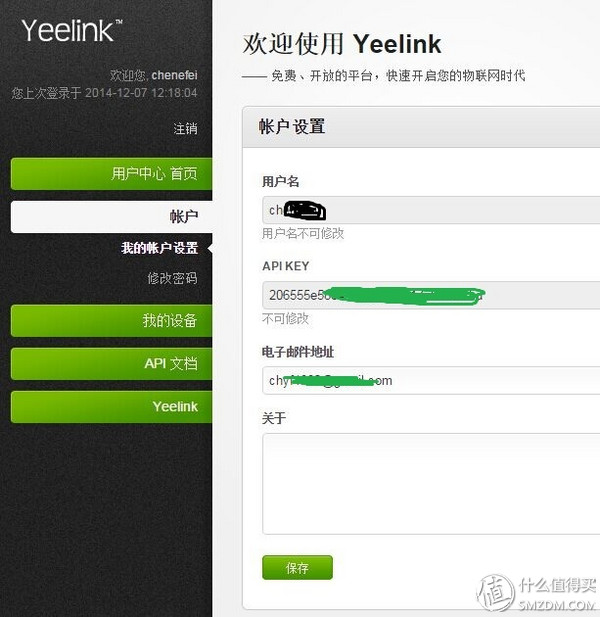
 Then find your own apikey in the account:
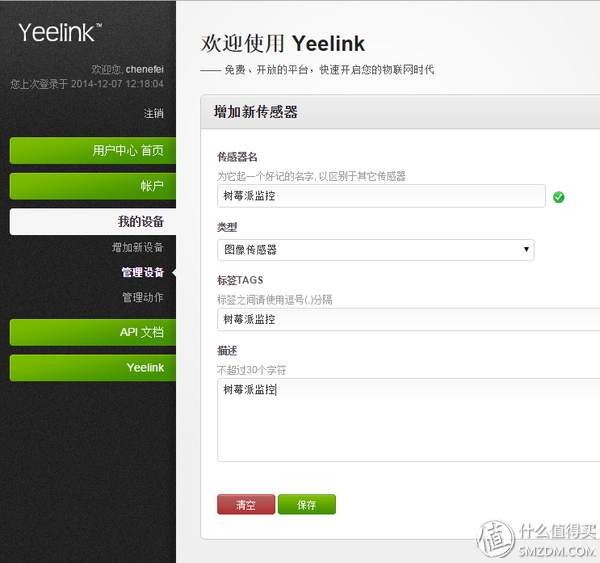
Then add a sensor:
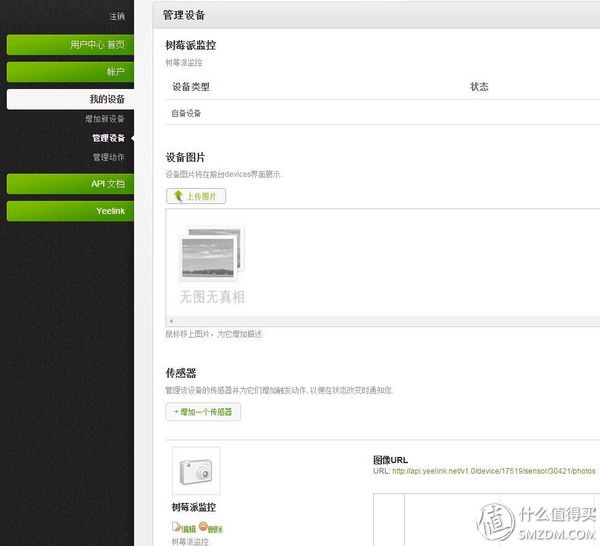
 After saving, returning to the sensor interface will give you a url address:
Yeelink here is set up, the following to get the raspberry pie settings, create yeelink.sh file:
Vi /home/pi/yeelink.sh
Many people like to use nano, I like to use vi, because I used to use freebsd before.
Raspistill -w 1024 -h 576 -o /home/pi/image.jpg
Curl --request POST --data-binary @"/home/pi/image.jpg" --header "U-ApiKey: fill in your APIKEY here" --url http://api.yeelink.net/v1 .0/device/176/sensor/121/photos (use your own url instead)
Then press Ctrl+X to save the connection behind http, you want to change your own. If you use a usb camera,
Need to install fswebcam first, it can realize the function of photographing with USB camera.
Sudo apt-get install fswebcam
Then create yeelink.sh
Sudo fswebcam -d /dev/video0 -r 320x240 --bottom-banner --title "RaspberryPi @ Yeelink" --no-timestamp /home/pi/image.jpg
Curl --request POST --data-binary @"/home/pi/image.jpg" --header "U-ApiKey: fill in your APIKEY here" --url http://api.yeelink.net/v1 .0/device/176/sensor/121/photos (use your own url instead)
Add executable permissions to this script
Chmod +x /home/pi/yeelink.sh
Now execute this command to see if the upload was successful without /home/pi/yeelink.sh
If you find that it is not running, please make sure you give yeelink executable permission, because many times, after installing the system, we will add a new account. All information processing is handled by this user, not the pi user. Please save the yeelink.sh file to the correct user directory and give executable permission. Since monitoring is done, I certainly don't want to run this program every time. Automatic startup is necessary: ​​Run the crontab -e command and enter the following:
/1 /home/pi/yeelink.sh
This is a picture in the middle, this frequency is actually not high, for the thief may have been shaken over, so you can change to a smaller time, but the yeelink platform has restrictions on this. The time interval cannot be less than 10 seconds, otherwise Yeelink does not recognize it.
In this way, picture monitoring is completed.
There is still a more stable picture of bed space: Baidu cloud, using Python's licensed work, can be directly saved to Baidu cloud disk, and, this is more private, unlike yeelink, its own sensor is open, only yeelink own home The sensor is not open.
The next step is to make a small home NAS, used to download movies, and as a home video storage center.
I bought a B-type raspberry pie, and the memory is 512M, if the light and light runs a CPU and the memory usage is negligible for picture monitoring. Inevitably, it is too wasteful, it is not in compliance with DIY, and it is not a waste of purpose. Moreover, the 20M optical fiber at home is not used during the day, and it is wasted in the evening hours. It was a serious waste of the entanglement and "great ambition" that telecommunications had to pay so much money.
For a family with a smart TV, but also to watch movies and American dramas, Caton is intolerable. It is also a minimum requirement to be able to see recent episodes. It's best to have a robot help us when I go to work. Get ready for the show. When I returned home, I could see freshly-baked American dramas. The most crucial thing was that when I suddenly heard that a certain movie had come out and I was given some seeds, I could immediately arrange for him to download.
Well, with the Raspberry Pi, aren't all these cakes?
In the raspberry pie installed a bt download software is not it? , In conjunction with the mobile phone APP, remote control, this is the prototype of a smart audio and video system.
Ever since he began searching for software, many people are accustomed to using Thunder to download, but many PT originals do not support Thunder download, but I can not install more than a few software, after all, this will affect the performance of the Raspberry Pi, do not With my Thunder offline, it will take time for you to download the downloaded items from Thunder offline. The most important thing is that Thunder offline requires the support of soft baby coins. If you have, congratulations, then you will be cool.
At this time Aria2 and transmission entered my sight.
Both of these softwares have a large user base, and both can be managed via mobile apps and software. The former's web client functionality seems to be a bit more powerful and can support Thunder offline. If you are a local tyrant, there is a Thunder member and Aria2 is your first choice.
It is a pity that I am not a local tyrant. So I chose transmission.
I have not reduced the quality of life because of the choice of transmission, because the transmission has already achieved all my dreams about home theater.
Since we have to do nas and download machines, there is still another piece of software that must be samba. He was born for sharing. Regardless of windows or Android, or other systems, you can access the video file on the Raspberry Pi. In a word, cross-platform stuff is cool!
Because of the cross-platform capabilities of samba, the Raspberry Pi's external hard disk can be used without the ntfs format because the monitoring system is also installed in front of it. It is also placed in a relatively hidden place. Of course, we can't take the hard drive every day, right? ? Let her be a quiet underground worker.
Well, the nonsense has already said a lot, start:
First of all, the hard disk formatted into ext4 format can be formatted in windows or raspberry pie. 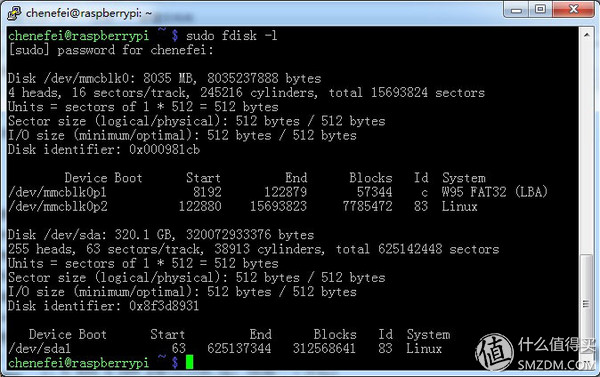
After you insert the hard disk and run the sudo fdisk -l command directly, you can see the hard disk device.
Where /dev/sda1 is the hard disk device number
Sudo fdisk /dev/sdb1
Enter the command line state:
Enter m to come up menu a toggle a bootable flag
b edit bsd disklabel
c toggle the dos compatibility flag
d delete a partition Note: This is the action to delete a partition;
l list known partition types Note: l is to list the partition type, so that we can set the type of the corresponding partition;
m print this menu Note: m is to list help information;
n add a new partition Note: Add a partition;
o create a new empty DOS partition table
p print the partition table Note: p lists the partition table;
q quit without saving changes Note: Exit without saving;
s create a new empty Sun disklabel
t change a partition's system id Note: t changes the partition type;
u change display/entry units
v verify the partition table
w write table to disk and exit Note: Write the partition table to the hard disk and exit;
x extra functionality (experts only) Note: Extended applications, expert functions;
Check no partition with p
Device Boot Start End Blocks Id System
If there is no partition to create, use n, if there is a partition, delete all d.
Select n to create a new partition
n Add
p expands to e;
Primary partition is p1
Create the first partition
Enter Enter the default carriage return
Then P sees the partition where sdb1 was created
w Unmount the hard disk before saving and exiting formatting Use the umount command and then format it to ext4 format
Mkfs.ext4 -L usbdisk /dev/sdb1 Formatted with usbdisk and loaded once, mount /dev/sda1 L /media/usbdisk
After the ext4 hard disk is loaded once, it does not need to be automatically loaded every time. Because the system will automatically load, if you use fstab inside the add command to load an error, resulting in the system can not boot to normal state (this is what the specific reason does not know, when I test it myself, and may use ntfs format before The settings are related).
Reboot reboots the system,
Then change the user's profile of the usbdisk directory to sudo chown pi:root /media/usbdisk
Then the folder's specific read and write permissions. Sudo chmod -R 777 /media/usbdisk
Where -R is the recursive change permissions for all subfolders to 777
I use class10 SD card, test ext4 format hard disk, copy speed can reach 6M +
The NTFS format is only a few hundred K, and when the video is downloaded, the CPU resource consumption is extremely high, with a maximum of 89%. After a long time, for example, two days later, it is easy to crash.
So This is why I chose ext4 directly. If you often want to use the file system with the windows system, you still have to endure the NTFS format.
Of course, to use this format, you also need to install ntfs-3g, and you need to set up to automatically mount the hard disk.
However, I do not recommend doing so. After all, there are still ext-format file reading software under windows. Although there is no direct operation, it can be replaced.
In summary, using ext4 is the perfect solution.
The hard disk is ready. Then start the software installation:
First install samba:
Sudo apt-get install samba samba-common-bin
Then modify the configuration file: /etc/samba/smb.conf.
Because it is shared internally, there is no need for security settings, so remove all the configuration and replace it with the following code: [global]
Workgroup = WORKGROUP
Netbios name = jiazhoulvke
Server string = Linux Samba Server
Security = share
[samba]
Path = /media/usbdisk/
Writable = yes
Browseable = yes
Guest ok = yes
Change the restart samba service:
Sudo /etc/init.d/samba restart
This smb is also installed, and now we have a low-power NAS.
The next step is to install BT download software:
She not only supports the mobile app, but also it is also controllable through the web interface!
1) First install the transmission:
Sudo apt-get install transmission-daemon
2) Then create a download directory, one is the downloaded directory, one is the unfinished directory, the specific directory is determined according to your situation:
Mkdir -p /media/usbdisk/incomplete for incomplete downloads
Mkdir /media/usbdisk/complete finished downloads
3) Also configure the permissions of the directory:
Sudo usermod -a -G debian-transmission pi
Because the ext4 format is loaded by default, there will be no permission. Just add permissions manually.
Chgrp debian-transmission /media/usbdisk/incomplete
Chgrp debian-transmission /media/usbdisk/complete
Chmod 770 /media/usbdisk/incomplete
Chmod 770 /media/usbdisk/complete
4) Modify the configuration file /etc/transmission-daemon/settings.json , which is a json format file, many configuration items, but the key to change the following:
Download directory location:
"download-dir": " /media/usbdisk/complete",
Unfinished download directory
"incomplete-dir": "/media/usbdisk/incomplete",
Whitelist address allowing Web access
"rpc-whitelist": "192.168.1.",
This IP segment depends on your router settings, you know.
If you need to use a mobile phone to control, and control the unit or the field, then you have to set the following settings:
"rpc-whitelist-enabled": false,
If you want to change the username and password:
Change the settings:
"rpc-password":"Password" The password can be written directly here. It will be automatically encrypted after restart.
"rpc-username": "New User Name"
5) Finally, after the configuration is complete, restart transmission. Note that the following two commands are executed in sequence. If you restart individually, the configuration is not saved:
Sudo service transmission-daemon reload
Sudo service transmission-daemon restart
Now it's time to access the IP plus port 9091 in the browser: for example: http://192.168.1.3:9091/. When entering the user name and password, the default is: transmission.
You now have an independent BT download server! Interface function is complete, can do speed limit and other settings.
For details on the transmission configuration, please refer to: EditConfigFiles.
Modify the transmission username and password:
1) Stop service first: sudo service transmission-daemon stop
2) Start the service again: sudo service transmission-daemon start. The transmission will automatically encrypt the new password when it starts.
In addition, transmission listens on port 51113 by default. It is best to do port forwarding on the router and transfer this port to its IP address.
If you want to use cell phones to manage the transmission, then there is also a router that supports the peanut shell service, login to the peanut shell and set up port forwarding.
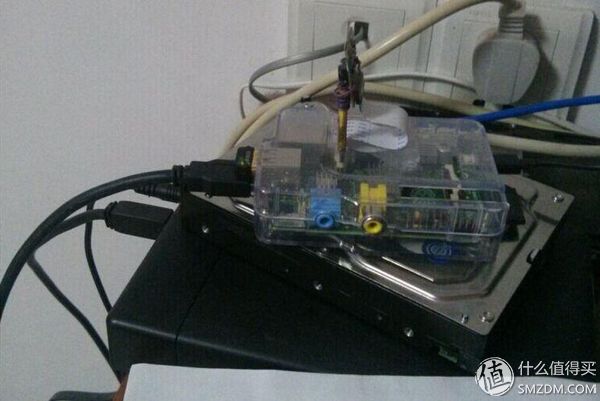
This is the final product, with two fixed poles removed from an old surveillance camera, and the official Raspberry Pi camera is fixed directly to the housing. It is a bit unsightly to find the shell again.
Because of the time, the human infrared detection module has not been installed. After the installation is complete, I will continue to use Baidu Cloud's usage plan. Recently we also started a WeChat camera with a banana pie. This camera can be used alone. It should be possible to form a monitoring group with this camera.
PSE Solar Cable are the kind of cable specially used for solar power systems. They have the following features and advantages:
1. High weather resistance: PSE solar cable are made of special materials, has excellent weather resistance, can be used for a long time in a variety of harsh outdoor environments, and are not easy to age and break.
2. High temperature tolerance: PSE solar cable can withstand the work in a high temperature environment, and will not cause electrical performance degradation or damage due to temperature rise.
3. High electrical performance: PSE solar cables have the characteristics of low resistance and low voltage drop, which can effectively transmit the electrical energy generated by the solar system and reduce energy loss.
4. Fire performance: PSE solar cables have made of flame retardant materials, have good fire performance, can effectively prevent the spread of fire in the event of a fire, protect the safety of the solar system.
5. Environmental protection and reliability: PSE solar cables meet environmental protection requirements, do not contain substances harmful to the environment, are safe and reliable, can be used for a long time without causing pollution to the environment.
In short, PSE solar cable iare the high-quality, high-performance cable products, suitable for the installation and operation of various solar power systems. They can provide stable and reliable power transmission, and have the advantages of weather resistance, high temperature resistance, fire resistance and environmental reliability, and are the indispensable part of the construction of solar energy systems.
PSE Solar Cable,Direct Current Cord Cable,Light Voltage Line,PV Solar Cable
Suzhou Yonghao Cable Co.,Ltd. , https://www.yonghaocable.com